| Version 1 (modified by , 18 years ago) ( diff ) |
|---|
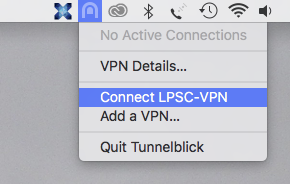
ACCES VPN AU LPSC
1 - Utilisation du WEB-VPN
Le WebVPN permet d’accéder à l’ensemble de l’intranet du LPSC (lpscintranet, resa, etc.). Il ne nécessite aucune installation sur la machine cliente et est accessible à partir d’un simple navigateur depuis Linux ou Windows. Le WebVPN ne permet pas l’accès au disque lpscdata, il ne permet pas non plus d’utiliser la passerelle de mail du lpsc depuis l’extérieur. Pour ces fonctions il faut utiliser le client VPN Cisco comme indiqué dans le paragraphe 2 ou 3. Avant d’essayer d’utiliser le WebVPN assurez-vous que vous possédez un compte sur Active Directory. Si ce n’est pas le cas vous pouvez en obtenir un par un simple mail à support@… Ouvrir un navigateur WEB, entrer L'URL
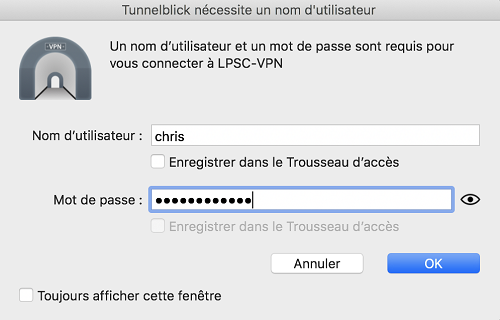
Une page d'accueil s'ouvre alors, demandant un login et un password. Taper votre login et le mot de passe associé correspondant à votre compte Windows Active Directory. Pour accéder à l’intranet il suffit d’entrer l’URL du serveur web correspondant dans la boite de dialogue « Enter Web Access URL » comme indiqué ci-dessous. De la même façon il est possible de se connecter au système de réservation depuis l’extérieur en entrant l’URL http://lpsc.in2p3.fr/resa 2 –Client Windows pour un plein accès VPN Installation du client Windows VPN Cisco L’installation du client Windows nécessite l’installation d’un logiciel client VPN sur votre ordinateur. Cette installation peut être effectuée par téléchargement de l’application à partir de l’intranet du LPSC. Pour cela il faut utiliser les instructions du paragraphe 1 de cette notice afin d’accéder à l’URL : http://lpscintranet.in2p3.fr/presentoir-windows/VPN/InstallShield.zip Décompresser le ZIP correspondant et exécuter le programme Setup.exe qu’il contient. L'installation se lance et nécessite un redémarrage du système Vérification des réglages d'accessibilité : Aller dans le menu démarrer --> Cisco Systems VPN Client, et faire une copie du client VPN sur le bureau de votre ordinateur. Lancer le client VPN et régler comme indiqué les propriétés d’ouverture de session Windows. Création d’une nouvelle connexion VPN Il faut ensuite créer une nouvelle entrée de connexion en utilisant le bouton “nouveau”, et on arrive sur une fenêtre où plusieurs champs sont à renseigner :
- Nom de la connexion (LPSC VPN)
- Description (connexion au LPSC)
- Adresse IP ou nom de l'hôte, c'est-à-dire du serveur VPN (193.48.83.130 ou lpscvpn.in2p3.fr)
- la méthode d'authentification pour la création du tunnel (groupe d'authentification)
- le nom du groupe lpscvpn et son mot de passe qui vous a été donné par mail.
Voir figure ci-après.
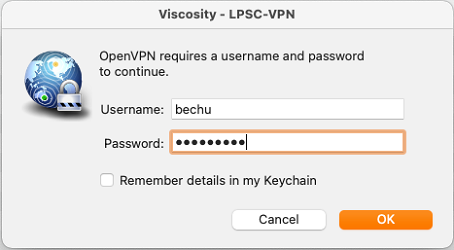
Dans l'onglet transport, Activer le tunneling transparent en IPSEC sur TCP Eventuellement autoriser l'accès au réseau local (pour l'accès aux ressources locales si vous avez plusieurs machines sur votre réseau). Enregistrer Connexion VPN au LPSC Lancer le client VPN CISCO. Sélectionner la connexion « LPSC VPN » et cliquer sur “connecter” S'ouvre alors un prompt demandant la saisie du nom d'utilisateur et de son mot de passe (dans notre cas, il s'agit d'un compte Active Directory) Configuration d’un client LINUX
Pour un fonctionnement optimal il est conseiller de télécharger la dernière version du logiciel sur le site de Cisco.
Une fois l'archive télécharger :
# tar -xvzf /chemin/vpnclientxxxx
# cd ./vpnclient #./vpn_install Cisco Systems VPN Client Version 3.7.2 (Rel) Linux Installer Copyright (C) 1998-2001 Cisco Systems, Inc. All Rights Reserved. By installing this product you agree that you have read the license.txt file (The VPN Client license) and will comply with its terms. Directory where binaries will be installed usr/local/bin Automatically start the VPN service at boot time [yes] In order to build the VPN kernel module, you must have the kernel headers for the version of the kernel you are running. For RedHat 6.x users these files are installed in /usr/src/linux by default For RedHat 7.x users these files are installed in /usr/src/linux-2.4 by default For Suse 7.3 users these files are installed in /usr/src/linux-2.4.10.SuSE by default Directory containing linux kernel source code lib/modules/2.4.18-19.7.x/build
- Binaries will be installed in "/usr/local/bin".
- Modules will be installed in "/lib/modules/2.4.18-19.7.x/CiscoVPN".
- The VPN service will be started AUTOMATICALLY at boot time.
- Kernel source from "/lib/modules/2.4.18-19.7.x/build" will be used to build the module.
Is the above correct [y] Making module Create module directory "/lib/modules/2.4.18-19.7.x/CiscoVPN". Copying module to directory "/lib/modules/2.4.18-19.7.x/CiscoVPN". Creating start/stop script "/etc/init.d/vpnclient_init". Enabling start/stop script for run level 3,4 and 5. Creating VPN configuration file "/etc/CiscoSystemsVPNClient/vpnclient.ini". Installing license.txt (VPN Client license) in "/etc/CiscoSystemsVPNClient/": Installing bundled user profiles in "/etc/CiscoSystemsVPNClient/Profiles/":
- New Profiles : sample
Copying binaries to directory "/usr/local/bin". Setting permissions. /usr/local/bin/cvpnd (setuid root) /etc/CiscoSystemsVPNClient (world writeable) /etc/CiscoSystemsVPNClient/Profiles (world writeable) /etc/CiscoSystemsVPNClient/Certificates (world writeable)
- You may wish to change these permissions to restrict access to root.
- You must run "/etc/init.d/vpnclient_init start" before using the client.
- This script will be run AUTOMATICALLY every time you reboot your computer.
Il faut maintenant charger le module dans le noyau (par la suite, cela se fera automatiquement lors du démarrage du système) :
# /etc/init.d/vpnclient_init start Starting /opt/cisco-vpnclient/bin/vpnclient: Done
Voilà, le client vpn est installer et charger dans le noyau. Il faut maintenant créer un profile de connexion. Pour cela il suffit de créer, à l'aide d'un éditeur de texte, un fichier au format pcf. Voici un exemple :
[main] Description=Profile lpscvpn Host=193.48.83.130 AuthType=1 Groupname=lpscvpn GroupPwd=* fournir ici le password qui vous a été donné dans le mail
accompagnant la documentation.
Username=gomes SaveUserPassword=0 EnableLocalLan=1 TunnelingMode=0 EnableBackup=0
Ceci est suffisant pour notre exemple. Il faut maintenant l'enregistrer dans le répertoire /etc/CiscoSystemVPNClient/Profiles/ sous le nom de lpscvpn.pcf.
On peut maintenant ouvrir le tunnel IPSEC :
# vpnclient connect lpscvpn (lpscvpn étant le profile choisi pour la connexion)
Cisco Systems VPN Client Version 3.7.2 (Rel)
Copyright (C) 1998-2005 Cisco Systems, Inc. All Rights Reserved. Client Type(s): Linux Running on: Linux 2.6.9-22.0.2.EL #1 Tue Jan 17 09:54:00 CST 2006 i686 Config file directory: /etc/opt/cisco-vpnclient Initializing the VPN connection. Contacting the gateway at 193.48.83.130 User Authentication for lpscvpn... Enter Username and Password.
Username [gomes]:
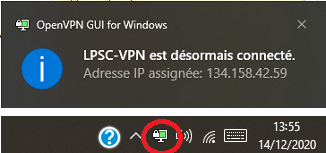
Password [ ]: Authenticating user. Negotiating security policies. Securing communication channel Your VPN connection is secure. VPN tunnel information. Client address: 134.158.47.250 Server address: 193.48.83.130 Encryption: 168-bit 3-DES Authentication: HMAC-MD5 IP compression: None NAT passthrough is active on port UDP 10000 Local LAN access is enabled
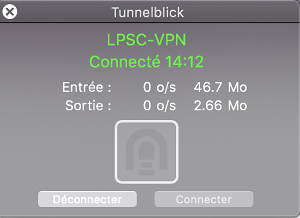
Le tunnel est établi.
Attachments (15)
- vpn-mac-2018-02-10.png (54.6 KB ) - added by 8 years ago.
- ecran-connexion.png (56.7 KB ) - added by 5 years ago.
- ecran-tunnelblick.png (120.7 KB ) - added by 5 years ago.
- VPN-W.png (157.7 KB ) - added by 5 years ago.
- OpenVPN-icone.png (27.7 KB ) - added by 5 years ago.
- OpenVPN-import.png (44.1 KB ) - added by 5 years ago.
- VPN_linux_1.png (41.7 KB ) - added by 5 years ago.
- VPN_linux_2.png (49.3 KB ) - added by 5 years ago.
- OpenVPN2.png (10.7 KB ) - added by 4 years ago.
- VPN-W-login.png (43.6 KB ) - added by 4 years ago.
- VPN-W-login2.png (53.7 KB ) - added by 4 years ago.
- Viscosity1.png (61.0 KB ) - added by 4 years ago.
- Viscosity2.png (28.9 KB ) - added by 4 years ago.
- Viscosity3.png (65.8 KB ) - added by 4 years ago.
- Viscosity4.png (38.2 KB ) - added by 4 years ago.
Download all attachments as: .zip